Drug Detail:Sinuva (Mometasone nasal [ moe-met-a-sone ])
Generic Name: MOMETASONE FUROATE 1350ug
Dosage Form: implant
Drug Class: Nasal steroids
Recommended Dosage
The recommended dosage is one SINUVA Sinus Implant (1350 mcg of mometasone furoate) placed in an ethmoid sinus [see Dosage and Administration (2.3)]. The SINUVA Sinus Implant may be left in the sinus to gradually release the corticosteroid over 90 days. Remove the SINUVA Sinus Implant by 90 days or earlier at the physician's discretion [see Dosage and Administration (2.4)].
Health Care Provider Training
The SINUVA Sinus Implant is to be used by physicians trained in otolaryngology. Specialized training is not required for these physicians.
Placement of SINUVA Sinus Implant
The SINUVA Sinus Implant is designed for single patient use only. Do not reprocess or reuse.
- Do not use if the package is open, the package or product is damaged, or has evidence of gross contamination.
- Special care should be taken to avoid bending, twisting, or damaging the implant.
- The implant is not designed to be modified by the physician.
- The implant is not intended to be compressed and loaded into the Delivery System more than two times. The implant must be placed under endoscopic visualization.
Patient Preparation
The patient should be prepared following routine protocols for in-office sinonasal endoscopic procedures.
Implant Preparation
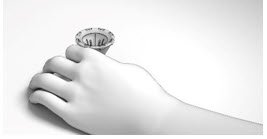
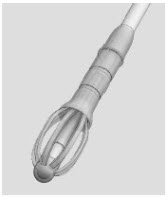
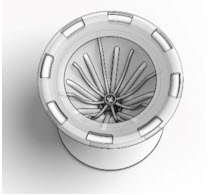
The SINUVA Sinus Implant (Figure 1) is loaded into a Delivery System and placed in the ethmoid sinus.
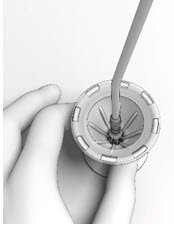
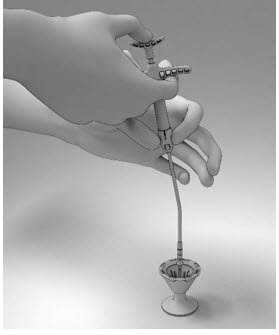
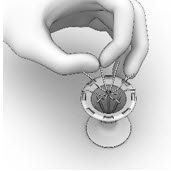
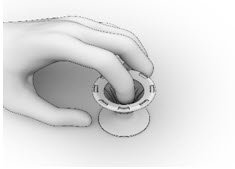
Remove the Crimper (Figure 2) and the Delivery System (Figure 3) from their protective packaging using sterile technique. Inspect the SINUVA Sinus Implant located inside of the Crimper (Figure 2). Do not remove the Implant from the Crimper. Prior to use, the SINUVA Sinus Implant must be crimped and loaded into the Delivery System.
If the SINUVA Sinus Implant is not fully seated inside of the Crimper, secure the SINUVA Sinus Implant before proceeding. See instructions to secure the SINUVA Sinus Implant (Figure 12–15).
| IMPLANT | Length (nominal): | 20 mm |
| Expanded Diameter (nominal): | 34 mm | |
| DELIVERY SYSTEM | Shaft Length | 117 mm |
Figure 1: Implant

Figure 2: Crimper with Implant

Figure 3: Delivery System

- Place the Crimper on a flat surface and hold to prevent any potential slipping of the Crimper during loading of the SINUVA Sinus Implant into the Delivery System. Orient the Crimper such that the short ends of the Implant are in the 12 o'clock and 6 o'clock position (Figure 4).
Figure 4
- Grasp the Delivery System with the index and middle fingers on the left or right hand using the Finger Rests and the thumb in the Thumb Rest (Figure 5).
Figure 5
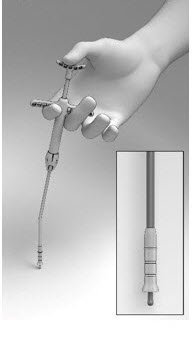
- Pull back on the Finger Rests while pressing down on the Thumb Rest to retract the Cup and expose the Seeker (Figure 6).
Figure 6

- Position the tip of the Seeker with its 10° angled tip downwards toward the user in the depression in the center of the SINUVA Sinus Implant (Figure 7). The distal end of the angled shaft must be in a vertical position, perpendicular to the Crimper, during positioning. Ensure the plane of the angled tip is in the same plane as the short ends of the Implant that were oriented in the 12 o'clock / 6 o'clock position in step 1.
Figure 7
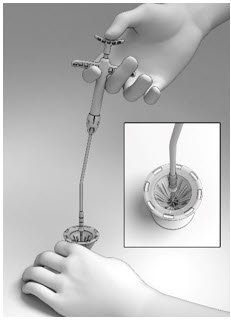
- With the Thumb Rest depressed, gradually apply perpendicular downward force to the SINUVA Sinus Implant until the ends of the Implant collapse around the Seeker of Delivery System (Figure 8). Make sure that the Finger Rests are not released while pushing downwards.
Figure 8
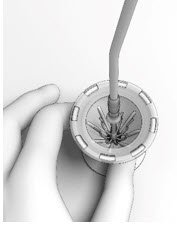
- The SINUVA Sinus Implant should crimp in a radial fashion onto the Seeker. Implant ends should not cross over or past each other when being crimped onto the Seeker by the Crimper.
- While maintaining steady downward pressure on the Thumb Rest, slowly release the Finger Rests with the index and middle fingers until the Cup lowers and captures all ends of the SINUVA Sinus Implant (Figure 9). If necessary, adjust the position of the Delivery System with slight circular movements, slightly lifting and then lowering the Cup into position to ensure that all eight ends of the SINUVA Sinus Implant are secured within the Cup.
Figure 9
- Apply a downward push on the Delivery System to ensure that the SINUVA Sinus Implant is secured in the Cup (Figure 10). This will also ensure the Implant is compressed to its smallest profile for insertion.
Figure 10
- Retract the Delivery System from the Crimper. The SINUVA Sinus Implant should remain symmetrically loaded in the Cup of the Delivery System (Figure 11).
Figure 11


CAUTION: Do not leave the SINUVA Sinus Implant in the crimped state for more than 5 minutes prior to placement.
Instructions to Secure the SINUVA Sinus Implant in the Crimper
If necessary, the Implant may be reloaded into the Crimper for a second time.
CAUTION: The SINUVA Sinus Implant should not be used if the second attempt to crimp is unsuccessful.
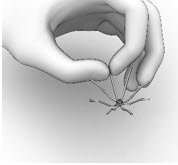
- Hold the SINUVA Sinus Implant by one end as shown in Figure 12.
Figure 12
- Holding the SINUVA Sinus Implant with the dome-shaped Cap positioned downward (Figure 13), place the Implant back into the Crimper.
Figure 13
- Ensure that each Implant is secured in the Crimper by pressing down on the center of the Implant until all ends of the Implant are below the rim of the Crimper (Figure 14).
Figure 14
- Inspect the Implant and the Crimper to ensure that all the Implant ends are secured below the rim of the Crimper (Figure 15). Return to Implant Preparation Step 1 for instructions on how to load the re-secured implant into the delivery system.
Figure 15


Instructions for the SINUVA Sinus Implant Placement
Advance the Delivery System under endoscopic visualization into the ethmoid sinus cavity.
- Ensure that the Delivery System is oriented such that the 10° curvature of the distal tip is curved superiorly. Insert the Delivery System such that the Shaft is parallel to roof of ethmoid sinus.
- If the SINUVA Sinus Implant becomes dislodged from the Delivery System prior to placement into the ethmoid sinus, remove the Implant and inspect for damage, re-load the undamaged Implant in the Crimper, and re-crimp the Implant into the Delivery System. Note that the SINUVA Sinus Implant should not be loaded into the Delivery System more than twice.
- Release the SINUVA Sinus Implant by pressing down on the Thumb Rest while pulling back on the Finger Rests in a controlled manner.
- Place the SINUVA Sinus Implant amongst the sinus polyps with the cap oriented toward the posterior ethmoid sinus, and with the Implant positioned as superiorly as possible in the sinus. The long ends of the Implant should be in approximately the 2 o'clock, 4 o'clock, 8 o'clock and 10 o'clock positions, respectively. Confirm final placement of the SINUVA Sinus Implant by endoscopic visualization. To adjust the position of the SINUVA Sinus Implant, use the Seeker on the Delivery System or standard endoscopic surgical instruments.